
In this blog, we will talk about Google Analytics for Firebase and its usage in Flutter. We will go through the basic implementation of it, see what events are tracked by default and what events require additional implementation in order to be tracked. We will explain the implementation process on an example of a project we used it for.
See here for an introduction to app development with Flutter.
First, let’s see what the benefits are.
The benefits of using Google Analytics for Firebase
As it says on the Google Analytics for Firebase website, the key capabilities of Google Analytics is that it provides:
- Unlimited reporting on up to 500 distinct events
- Audience segmentation – defining custom audiences based on device data, custom events, or user properties
- Engagement insights – every user interaction with the application can be tracked – every screen opening, every button clicked, every triggered event, etc.
Why we used Firebase Analytics in Flutter
On a few projects we had, Firebase Analytics was the feature that needed to be implemented. The best approach to this is to have only one class where everything for Firebase Analytics is handled. That way everything related to Firebase Analytics is in one place, easy to edit and update, but also easy to add new features in the future.
Also, since Flutter is still fresh, we can count on breaking changes in some updates of the library – so as said, we have everything regarding Analytics on one place and only one place to update possible breaking changes.
Step-by-step process of adding Google Analytics for Firebase to a Flutter app
There is an official Flutter plugin for adding Google Analytics for Firebase on pub.dev. In order to use the plugin, it has to be added as a dependency in pubspec.yaml file. Also, the platform specific configuration should be implemented in order to connect the app to the Firebase project. This is done by registering the app’s Android package name or iOS bundle id and generating the configuration file for every registered package name or bundle id.
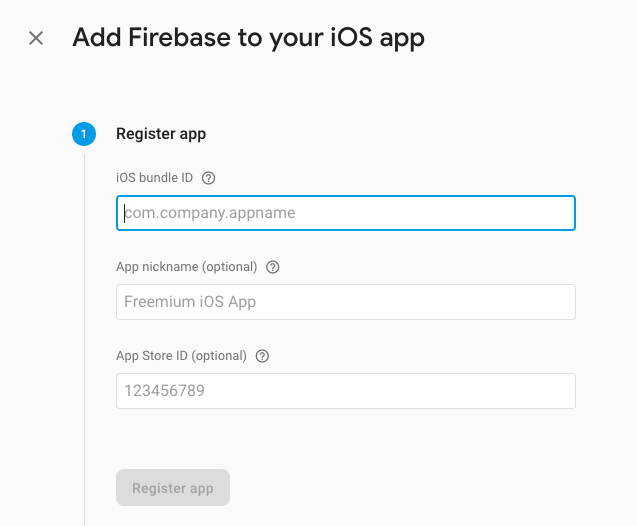
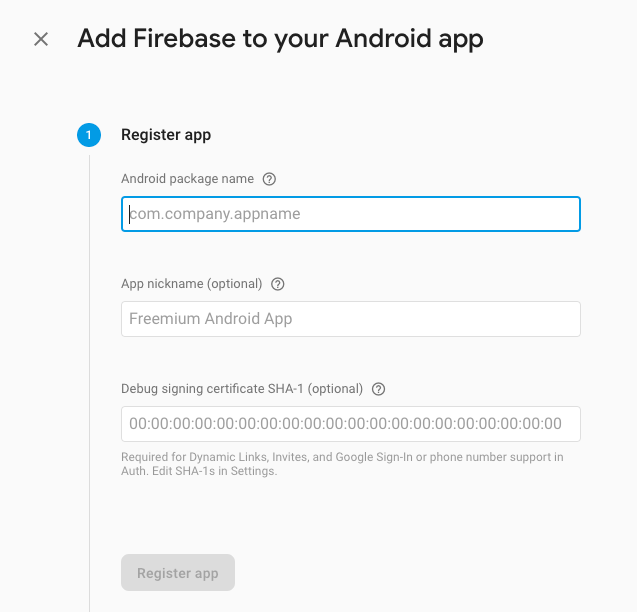
If the registered application is an iOS app, then the GoogleService-Info.plist configuration file is generated which needs to be put in the Runner subfolder of the iOS directory of the Flutter project. If the registered application is an Android app, then the google-services.json file configuration file is generated which needs to be put in the android/app directory. After that all prework is done and we can start implementing desired functionalities of the Analytics.
Initialize FirebaseAnalytics
First thing is the initialisation of the FirebaseAnalytics. This is done in the App class. To track the PageRoute transitions, FirebaseAnalyticsObserver needs to be added to the list of NavigatorObservers on app Navigator.
FirebaseAnalytics analytics = FirebaseAnalytics();

return MaterialApp(
  navigatorObservers: [
    FirebaseAnalyticsObserver(analytics: analytics),
  ],
);
By implementing FirebaseAnalyticsObserver in this way, it automatically tracks every page transition made with Navigator – every named route. If there is a need for some custom implementation of tracking screens and events, it has to be manually implemented.
The best way to do it is by creating the Analytics class which will handle all requests of tracking in one place. For that, we use provider dependency from pub.dev. Provider dependency is a wrapper around InheritedWidget to make them easier to use and more reusable. From the official documentation: By using provider instead of manually writing InheritedWidget, you get:
- simplified allocation/disposal of resources
- lazy-loading
- a largely reduced boilerplate over making a new class every time
- devtools friendly
- a common way to consume these InheritedWidgets
- increased scalability for classes with a listening mechanism that grows exponentially in complexity (such as ChangeNotifier, which is O(N²) for dispatching notifications)
So, to implement it with provider dependency, MaterialApp needs to be wrapped with a MultiProvider widget. It merges multiple providers into a single linear widget tree which is used to improve readability and reduce boilerplate code of having to nest multiple layers of providers.
return MultiProvider(
 providers: [
  Provider<AnalyticsUtils>(
    create: (_) => AnalyticsUtils(analytics),
  ),
 ],
 child: MaterialApp(
  navigatorObservers: [
    FirebaseAnalyticsObserver(analytics: analytics),
  ],
 ),
);
As previously said, inside the AnalyticsUtils class, we will do everything related to the Analytics to keep that part separated from the rest of the application. On that way, most of the changes and updates related to the Analytics can be done in that single class.
class AnalyticsUtils {
 final FirebaseAnalytics _analytics;

 AnalyticsUtils(this._analytics);

 void setUserLanguage(String languageCode) {
   _analytics.setUserProperty(name: "app_language", value: languageCode);
 }

 void setTrackingScreen(String screenName) {
   _analytics.setCurrentScreen(screenName: screenName);
 }
}
Example of AnalyticsUtils class – two methods
We have two methods for recording the data on Google Analytics. First one is the setUserLanguage() which calls setUserProperty() method from FirebaseAnalytics class.
This example records the language that the user has selected in the app. Up to 25 user property names are supported. Once set, user property values persist throughout the app lifecycle and across sessions. To set the user’s selected language, simply call the method from AnalyticsUtils by using read() method of provider dependency:
context.read<AnalyticsUtils>().setUserLanguage(_languageCode);- The second method is setTrackingScreen() which calls setCurrentScreen() method from FirebaseAnalytics class. It sets the current screenName, which specifies the current visual context in the app. This identifies the areas in the app where users spend their time and how they interact with the app.
As previously said, current screenName is tracked automatically with implementation of FirebaseAnalyticsObserver. But, if the transition of the pages is not done with Navigator, it needs to be manually implemented in order to record user interaction with these pages.
For example, if the bottom navigation bar and it’s items are implemented with PageStorage widget with no need to navigate with named routes between the items, transition of the pages for every item in the bottom navigation bar will not be recorded automatically on Google Analytics.
In that case, to record the user behavior with bottom navigation items and pages, screen tracking needs to be implemented manually by using the setTrackingScreen() method which will be triggered when user click on every item from bottom navigation bar:
context.read<AnalyticsUtils>().setTrackingScreen("PAGE_NAME");Conclusion – Using Google Analytics for Firebase helps you build better apps
This was the example of the basic and simple implementation of the Google Analytics for Firebase in Flutter. Google Analytics offers a huge set of comprehensive in-app behavioral and marketing analytics for mobile apps, and we suggest you use it to get better insights and consequently build better, more user-friendly apps.
If you’re interested in other app analytics solutions, you can find more info on how to analyze app data by integrating Google Analytics with BigQuery here.
If you need help with configuring Google Analytics for Firebase, feel free to contact us.


-
Instagram
-
Linkedin
-
Facebook
info@samurai-digital.com